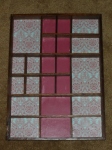
The first item that I upcycled when I began doing this, was a beat up old type set box. It was covered in dust and was screaming to be sanded and wiped down with some Murphy’s Oil Soap. At the time I didn’t know that I was going to start a blog so I didn’t take pictures as I went, but i promise to get better about that!
 Refurbishing this particular item started with sanding it with a fine grit sandpaper because the wood was fairly rough. After sanding, I wiped it clean with a damp cloth to remove the dust. Although the sanding made the wood much smoother, it still was craving some moisture. This came in the form of the wonderful product Murphy’s Oil soap. The type set box was so dry that it took multiple coats to rehydrate the wood.
While the box looked much better than when I had gotten it, it still seemed as though it was missing something, it was too plain. BRING OUT THE MOD PODGE! Now I’m not a scrapbooker really, nothing against them, I just can’t get into it personally. Scrapbook paper is beautiful though! Originally I wanted to take the back off so that I wouldn’t have to cut each square out, but with how thin the wood was, I was sure that it would split. Thus started one of the most frustrating projects I’ve ever taken on…
The one break that I got was that I didn’t have to cut out each of the squares separately. I found that if I held my mouth just right I could get the paper to slide underneath the dividers. The only problem with this was I couldn’t do the length of the box all at one time because it had to be put in at an angle so that it would slide underneath, and the paper wasn’t long enough.
 This created the problem of matching up the the pattern. You can imagine the amount of cursing and frustration that came about because of this. To alleviate some of it, and to break up the pattern, I decided to use the reverse side of the paper, which was maroon with some aging marks on it. After finally getting all of the pieces cut out, I put Mod Podge on the wood, and slid the paper into the sections. This was my first experience with Mod Podge, which can be seen in the bubbling under the paper. For tips on how to use Mod Podge, check out this video! Everything for me was going relatively well until I got to the far right section. I couldn’t get the paper to wedge itself under the dividers. The longer I tried, the more saturated the paper got with Mod Podge, and the less stability it and I had. Finally, much to my frustration the paper tore beyond repair. Back to Michaels I go, for another sheet of the scrapbook paper and another infuriating session of matching up patterns.
Finally all the sheets were in place and I brushed an additional layer of Mod Podge over the top of the paper to seal it. For those of you who haven’t used Mod Podge before don’t panic at this point of the project (like I did) because there is a milky white layer over the paper, it dries clear!
I was thinking that this item could now be a cute home for nick knacks. I hope you like the results and keep crafting!


